Enhance Learning with Alternatives for Audio
Contents
Introduction
While it is inherently clear that people with auditory disabilities (e.g., deaf, hard of hearing) and other relevant disabilities (e.g., auditory processing disorders) would benefit from having alternative options for audio, many people are unaware of how powerful such options may be for all learners, including college students without disabilities.
For example, in their 2016 study, Dallas, McCarthy, and Long found in their longitudinal study that students who were provided access to captioning for videos used for instruction outperformed peers who covered the same content in the same context without captions in terms of information recall and grades. Importantly, Dallas and colleagues also noted that the presence of captions had no negative impact, which has implications for showing videos (with captions) live in class. Gernsbacher, in her (2015) review of the literature, additionally highlights the substantial gains text-based options for audio provide for English language learners (language development as well as content comprehension) and college students with and without disabilities (with benefits including gains in attention, retention, and comprehension for everyone).
This module will address strategies for providing alternative options for auditory content (i.e., closed captions, transcripts) as a way for instructors to proactively support learners and enhance their learning experience through video and audio content. These strategies are relevant whether instructors teach using fully asynchronous online courses, blended learning experiences, or simply use audio/video materials in or out of class.
Objectives
After completing this module, participants will be able to…
- Identify universal benefits as well as the students’ legal rights and instructor responsibilities regarding the provision of closed captioning.
- Identify when to use captioning vs. transcripts and why each is better than the other in different contexts.
- Utilize different methods of captioning and/or transcribing audio and video files for education purposes.
UDL Alignment
Multiple Means of Engagement.Specifically, for English language learners or students with relevant disabilities, a UDL approach to providing alternatives for audio content may also dramatically improve their learning experience, reducing the barriers created by the extra steps the students must take to request accommodations and await captioned or transcribed media. In this case, the pressure of needing to pursue additional supports for access to language is a cognitive and temporal burden on some students that is a strong distraction from focusing on the learning experience and content. By proactively removing this distraction, students with disabilities and/or who are English language learners will be better equipped to learn with their colleagues.
Multiple Means of Representation.One of the foundational aspects of UDL is the provision of “multiple” or “flexible” means of representing content. While presenting information auditorily can be a great way to convey information and ideas, the UDL framework reminds us that no single strategy or approach will work for everyone. For example, CAST states:
Information conveyed solely through sound is not equally accessible to all learners and is especially inaccessible for learners with hearing disabilities, for learners who need more time to process information, or for learners who have memory difficulties. In addition, listening itself is a complex strategic skill that must be learned. To ensure that all learners have access to learning, options should be available for any information, including emphasis, presented aurally.
Further, the purpose of providing multiple means of representation is ultimately not simply perception, but comprehension. As we learn from Gernsbacher (2015), there is copious evidence that captions and transcripts positively contribute to comprehension.
Between the necessary and proactive support for some learners and the added benefit for all learners, this is one clear example of Meyer, Rose and Gordon’s (2014) statement that “what’s essential for some is good for all” (p. 36).
Instructional Practice
Cognitive Theory of Multimedia Instruction
As the summer faded, Dr. Jeeves was busy putting the final touches on his recorded lectures for his newly online graduate-level nursing course. He was excited at the prospect of his students – many of whom are busy professionals – being able to access his courses according to their own schedules. He painstakingly redesigned his materials and methods from live, in person lecture and demonstration and classroom activity to digital lecture, demonstrative videos, discussion forums, and clinical reflections.
Dr. Jeeves’ efforts largely paid off as his students seemed to really appreciate the asynchronous opportunity to learn around their unpredictable nursing schedules. However, he noticed two significant issues after the first few weeks.
First, he noted that his students seemed to generally performing more poorly when it came to comprehension and retention of some of the content in his lectures compared to previous classes and compared to his expectations. Quiz scores and nuance using key points from the lectures from prior semesters (in person) were both down, considerably.
Second, he learned that one of his students, who was hard of hearing, was facing obstacles with the course content. Dr. Jeeves knew that disability services was providing support for the student, but never considered how pursuing that support with disability services would present a burden to the student, who needed to ask for content to be transcribed for him and wait for transcription to occur before he could access the content that his peers accessed days before.
Dr. Jeeves, who prides himself in being an excellent and effective instructor, has begun to question if the benefits of moving his class online outweigh the drawbacks. He feels that these issues never manifested in the same way in his in-person classroom where live transcribers were available for students who needed them and where students seemed better able to comprehend and retain the lectures. He’s not ready to give up on the online model, but he is looking for reasonable solutions to address the barriers.
- Do you agree that the online environment tends to result in reduced student performance? Why or why not?
- How might Dr. Jeeves address both of the barriers he identified within a reasonable time and expenditure bounds?
Video-based instruction is very common in higher education, today. Such media allows for diverse content to be streamed live in a classroom or enables instructors to be beamed to students’ individual devices on demand with premade lectures, etc. Thus, video-based instruction may be a powerful tool for teaching and learning when used well.
One thing that video-based instruction allows for that live lectures do not is the provision of same-language subtitles (i.e., “closed captions.”)
While it’s possible to hire real-time captioners for a live class, such captioning is expensive and is always necessarily delayed at least a little (there’s a necessary lag between when someone says something and when it is captioned during live captions). You’ve probably noticed this if you’re a hearing person who has ever watched a live newscast or sporting event with the captions on.
On the other hand, pre-recorded video allows for syncopated caption and audio and can be developed inexpensively or free with less effort now than ever before! Enabling syncopated captioning is actually very important for maximizing the effectiveness of closed captioning. The reason for this is related to Mayer’s Cognitive Theory of Multimedia Instruction (2002), in which Mayer suggests that there are two primary and distinct channels for processing information (see also: dual coding theory,): auditory and visual. In principle, instructional design that facilitates matching and temporal and spatially proximal visual and auditory information enhances a learner’s ability to focus on, retain, and comprehend content. In other words, being able to listen and reading at the same time should theoretically be beneficial for hearing people even as the captions are essential for people who are deaf or hard of hearing. And it is!
Captions vs. transcripts.
Captions and transcripts are not the same thing. Closed captions refer to short (no more than two lines of text) text-based representation of spoken audio that appear in proximity with corresponding audio. A transcript, on the other hand, is audio converted into a block of text (as long as necessary), often in paragraph format.
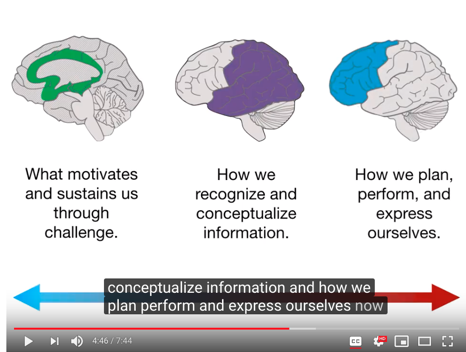
Figure 1: Video Captions
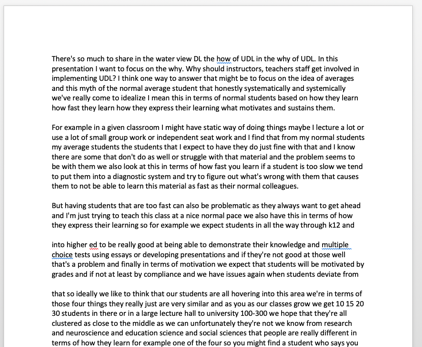
Figure 2: Video Transcript
It’s important to recognize that from a UDL perspective, both of these have a place. But their place is not the same!
The same cognitive theory of multimedia instruction (CTMI; Mayer) that we can use to justify the theoretical reason for the benefit of captions also helps establish why a transcript is not an appropriate accompaniment for a video (in lieu of captions). One of the principles of CTMI is known as the “modality” principle, which basically states that text accompanying narrated video
is a distraction from comprehension. In this case, “accompanying text” does not refer to closed captions; rather, it refers to transcripts.
The reason for this may be clear if you imagine trying to listen to- and watch- a video while simultaneously trying to keep your place in a paragraph-based transcript. And it should be clearer still if you imagine trying to do the same if you cannot hear what’s being said in the video (and thus have to do your best guesswork and inferring to figure out where you are in the video as you’re following along in the document). In such a case, the cognitive load is actually heightened by the presence of the transcript.
However, transcripts do have at least two important uses. First, a transcript can be useful when audio content is presented without video. Having a transcript to follow along through while listening to an audio file is a powerful option!
Second, a transcript can be provided as an alternative to a video. This is especially useful if the video is simply a person talking without any kind of visual demonstration (some people will prefer the transcript in such a case and would not miss anything by choosing that option) and is also good for reviewing or marking up content from the video in text-form. The following table provides these rules of thumb briefly.
When should I use….
| Closed Captions | Transcript |
|---|---|
|
|
What is Practice?
In this module, we’ll discuss two approaches to offering alternatives to audio: closed captioning and transcripts. As aforementioned, these have different uses in different contexts for different types of media. They also differ in practical terms of development.
If you are developing media yourself, a transcript may be written out ahead of time to guide your oral presentation. If you’re transcribing someone else’s work, then a transcript can be developed post-production. On the other hand, closed captions are always done post-production.
Below, I provide detailed instructions for creating captions and transcripts using different platforms. From this point, this module should be used as a reference.
Implementing Closed Captioning on Youtube
Upload and prepare
- Sign in and Access YouTube
- Navigate to the YouTube Website (www.YouTube.com)
- Sign in, in the upper-right corner
- Upload a Video
- Click the Upload button in the upper right corner of YouTube.
If this your first time uploading with this account, it will prompt you to enter your name and “Create Channel.”
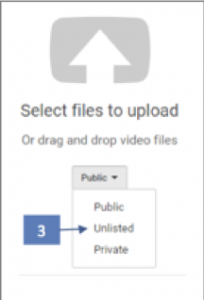
Figure 3: Selecting a video file to upload to Youtube
- Choose the video privacy settings.
- The default is set to Public. We recommend “Unlisted.” This can be changed later in “YouTube Studio”.
- Public videos and playlists can be seen by and shared with anyone. They can be found by searching YouTube or Google.
- Private videos and playlists can only be seen by you and the users you choose. Individual must be invited to view.
- Unlisted videos and playlists can be seen and shared by anyone with the link. Individuals must have the link to view.
- The default is set to Public. We recommend “Unlisted.” This can be changed later in “YouTube Studio”.
- Select the video you’d like to upload from your computer.
- If you set the video privacy to…
- “Public” or “Unlisted,” just click Done to finish the upload.
- “Private,” click on the Share button to specify who may access the video. Then click Done to finish the upload.
- If you set the video privacy to…
Access the Caption Interface
After your video has finished uploading…
- Click on your profile picture or icon in the top-right of the YouTube website.
- Click on “YouTube Studio”
- On the left-hand menu, click “Videos”
- Locate the video you wish to caption and click on its image or title.
- On the left-hand menu, click “Transcriptions”
- If prompted, set language to the spoken or signed language of the video.
- If English, we recommend “English” rather than “English (United States)” etc.
- Feel free to check the box to set this language to default for future uploads.
From this point, you will need to decide how you wish to caption the video. Two options and different steps are presented below. They continue from this point.
Option A: Auto-Caption and Edit
YouTube automatically creates captions. These have improved substantially in accuracy over the years. However, you must always review and edit the captions. To use this option, you must wait for YouTube to complete its auto-captioning of your video. This may be a few minutes to several hours depending on the length of your video and other factors. When it is done, it will show up as “English (Automatic)” in the video transcriptions page.

Figure 4: Youtube auto-captions
- Select “Published (automatic)” toward the right of the row with your chosen language.
- Click the “Edit” button to the top right of the video.
- Click where you want to make changes and edit the text. Type in changes, and use the “enter” key to create caption breaks. You can listen to the video if you need to determine what was intended.
- If needed, adjust the timing of the transcript to match the audio with the video by clicking, holding, and dragging the blue handles to shorten or lengthen the time. Click, hold and drag from the middle to move the entire block.

Figure 5: Auto-timing Closed Captions
Once editing is complete, click “Publish edits.” Make sure there is a green dot next to the captions labeled “English.”
6.The edited transcript will override the automatic captions as the default captions when the video is viewed with closed captions enabled.
Option B: Transcribe and Auto-sync
If you already have a transcript for your video outside of YouTube, you can upload the file to create captions. This is the fastest way to provide accurate captions. From the video transcription page where you left off after “access the caption interface” above…
- Click the blue “+” button toward the right-hand side to add new captions. If “English” isn’t available, you can either unpublish and delete the automatic captions or simply choose an English variant (e.g. “English (United States)”.
- Click the “Add” link in the “subtitles column for the new language.
- Click on “Transcribe and auto-sync”.
- Copy/Paste the transcript that matches the audio.
- Click “Set Timing.”
- Once timing is set, return to that caption file (e.g., “English (United States)”) and click “publish.”
- These captions will override the automatic captions when the video is viewed with closed captions enabled.
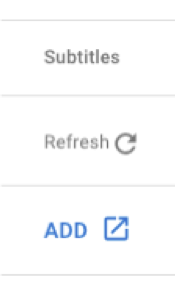
Figure 6: Adding closed caption file for subtitles

Figure 7: Auto-syncing subtitles
Implementing Closed Captioning using Amara
The YouTube methods are generally for videos you yourself own or to which you have rights. You can also use Amara in that case, but I wouldn’t recommend it. Overall, YouTube is easier if you have rights to the video being uploaded.
However, Amara allows you to caption other people’s streaming videos (from Vimeo or YouTube) even if you cannot explicitly gain their permission to do so. This isn’t possible on YouTube or Vimeo unless owners of videos cooperate with you.
Note that captioning other people’s videos without permission is copyright safe for two reasons:
First, the video will continue to stream from its original source. All Amara is doing is adding an “overlay” with the captions you add.
Second, allowing for streaming and embedding through other intermediaries is part of the user agreement when individuals upload public videos to YouTube or Vimeo.
So how do you do it?
Sign up/Sign in to Amara
- Sign in and Access Amara
- Navigate to the Amara website (https://amara.org)
- Sign up for free or log in, in the upper-right corner.
- Access the subtitling platform
- Navigate to the “Subtitling Platform” via link near the top center.
- Click on “Get Started” under the free platform.
- Where it says “Subtitle in a Public Space” click “Begin”
- Enter a URL to a YouTube or Vimeo video you wish to caption and click “begin”
- Contribute Captions!
- On the left-hand side of the screen, click on “Add a new language!”

Figure 8: Adding closed captioning with Amara
- Specify the language spoken in the video and the language into which you’d like to caption the video (e.g., English to both). Note that this platform is also very good for translating videos via subtitles.
- Follow the instructions in the interface.
- Play the video, typing what you hear.
- Don’t stress too much about line breaks.
- When finished transcribing the video, click “Yes, start syncing”
- After the sync completes, review the resulting captions and publish the resulting work.
- Share a link to the Amara site where the video is hosted. (e.g., “Why We Need Universal Design”).
- Alternatively, you may grab the embed code to embed the resulting video and captioning interface in your website or LMS.
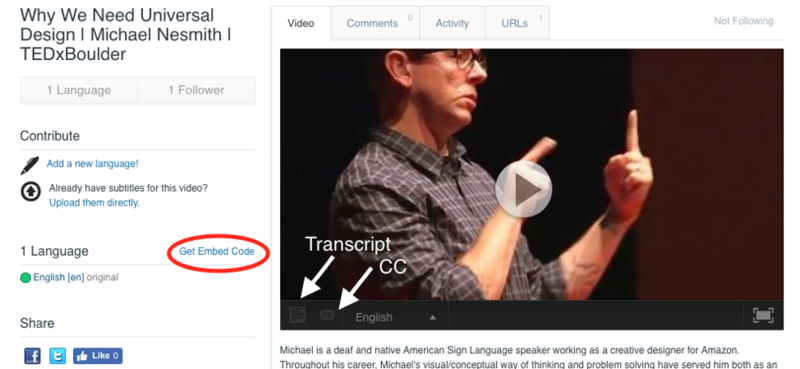
Figure 9: Using an embed code
Return to Dr. Jeeves: From Concept to Practice
Dr. Jeeves recognized the importance of supporting student cognition with video and audio learning by offering text-based supports, proactively. By using a high-quality microphone and speaking with intentional clarity, he was able to improve the accuracy of auto-captions in YouTube substantially and minimize how much time it took him to go back and make spot-edits to the automatic captions for his videos.
He didn’t just provide the captions, though, he also briefly informed his students of the research that supports the benefits of captions and encouraged them to turn the captions on when watching the lectures.
Finally, Dr. Jeeves quickly extracted transcripts from the captions on YouTube and provided a transcript as an alternative to- or supplement for- the captioned video for students who wished to use it and offered a little coaching on how, when, and why to use that.
This process extended Dr. Jeeve’s prep time a little, but the results in terms of student perception for and comprehension of the content of the video made it worthwhile. His hard-of-hearing student was also immensely relieved not to have the additional steps of having to request support from disability services for the videos or to facetime lag as those videos were processed and provided back.
Ultimately, everyone learned more and more easily, and Dr. Jeeves created powerful teaching and learning materials that he could re-use in future terms until it was time to update them. Dr. Jeeves learned what so many have through following the principles of UDL. What’s essential for some is good for everyone!
References & Resources
Collins, R. (2013). Using captions to reduce barriers to Native American student success. American Indian Culture and Research Journal, 37(3), 75–86. https://doi.org/10.17953/aicr.37.3.025wr5k68l15021q
Danan, M. (2004). Captioning and subtitling: Undervalued language learning strategies. Meta: Journal Des Traducteurs, 49(1), 67. https://doi.org/10.7202/009021ar
Gernsbacher, M. A. (2015). Video captions benefit everyone. Policy Insights from the Behavioral and Brain Sciences, 2(1), 195–202. https://doi.org/10.1177/2372732215602130
Lee, Y.-B. B., & Meyer, M. J. (1994). Closed-captioned educational video: implications for post-secondary students.
Mayer, R. E. (2002). Cognitive theory and the design of multimedia instruction: An example of the two-way street between cognition and instruction. New Directions for Teaching and Learning, 2002(89), 55–71. https://doi.org/10.1002/tl.47
Meyer, A., Rose, D., & Gordon, D. (2014). Universal Design for Learning: Theory and Practice. CAST Professional Publishing: Wakefield, MA.
Paivio, A. (1971). Imagery and language. In S. J. Segal (Ed.), Imagery (pp. 7–32). Academic Press. https://doi.org/10.1016/B978-0-12-635450-8.50008-X
UDL: Offer alternatives for auditory information. (n.d.). Retrieved November 6, 2018, from http://udlguidelines.cast.org/representation/perception/alternatives-auditory
About the Author

Dr. Eric J. Moore
Dr. Eric J. Moore is a UDL and Accessibility specialist as well as a higher education consultant via innospire.org. He has been a professional educator for over a decade and is committed the finding practical solutions to address the needs of contemporary, inclusive educational systems.
He greatly enjoys collaborating with others who are pioneering the work of UDL implementation in higher education, which is one of the reasons he co-founded the UDL in Higher Education Special Interest Group.